Get the HyperWRT firmware from http://www.hyperwrt.org/" Follow their installation instructions
Go to the router's administration interface. The default address for this is http://192.168.1.1 You can leave the "User" field blank. The default password is "admin"

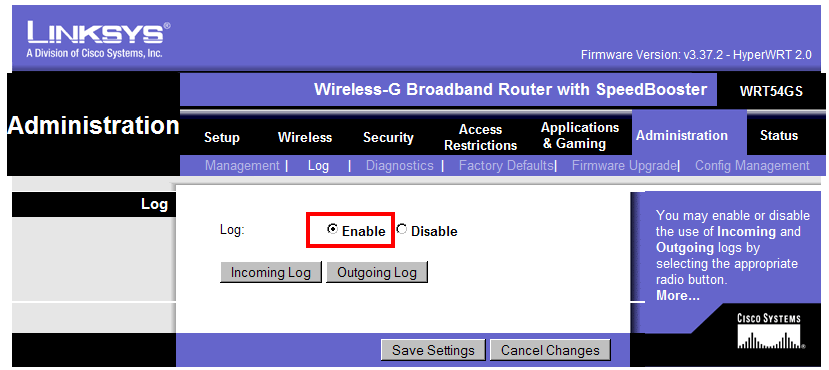
Make sure that Enable is checked.
Then, you must add some start up scripts to enable exporting the logs. (This is why you had to install HyperWRT--the Linksys firmware is incapable of exporting the logs.)

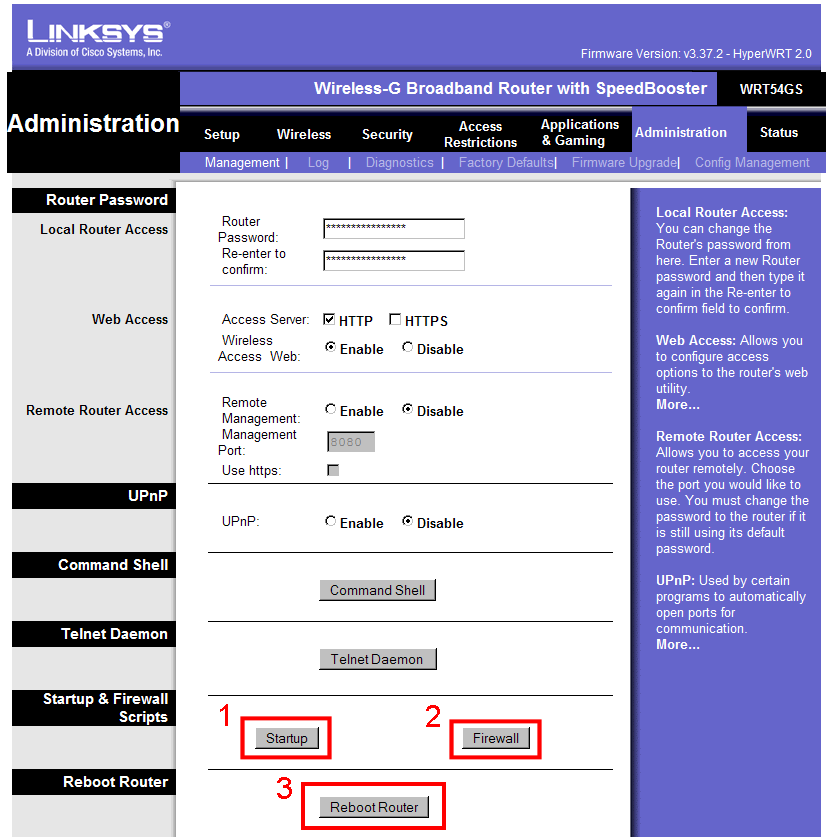
1. First add a startup script by clicking on the Startup button. Copy and paste
sleep 2
/sbin/klogd
/sbin/syslogd -R 192.168.1.100
echo "#!/bin/sh" > /tmp/loggit.sh
echo "while true" >> /tmp/loggit.sh
echo "/usr/bin/killall -9 klogd" >> /tmp/loggit.sh
echo "sleep 1" >> /tmp/loggit.sh
echo "/sbin/klogd" >> /tmp/loggit.sh
echo "sleep 960" >> /tmp/loggit.sh
echo "done" >> /tmp/loggit.sh
chmod 700 /tmp/loggit.sh
/tmp/loggit.sh &
into the Startup form. Change the IP address to the IP address of your machine (192.168.1.100, above). The IP of your machine must stay the same, so if your machine uses DHCP, change it to have a static IP.
-
Making your machine have a static IP 192.168.1.100 is the first address that the router will assign if your machine uses DHCP. But if there are other machines using the router and one of the other ones booted up first, the other machine might get '198.168.1.100' instead of you. So you should reconfigure your own machine to use a static IP that is above the router's IP (196.168.1.1) and the range that it will assign DHCP addresses to (198.168.1.100 - 198.168.1.150) Choose something like '198.168.1.15'First open an MS/DOS window and type ipconfig /all. Copy down the IP addresses of the DNS servers. Better yet:
ipconfig /all > ipconfig.txt
notepad ipconfig.txt
to get the results of ipconfig.txt in a text file and opened in Notepad.
Go to Control Panel/Network Connections/ Right click on Local Area Connection/ and choose Properties from the drop down menu. Select Internet Protocol (TCP/IP) and click on Properties
Deselect "Obtain and IP address automatically" Fill in
IP Address:   192.168.1.15
Subnet mask:  255.255.255.0
Default gateway: 192.168.1.1  (i.e., the address of your router)

Use the following DNS server addresses
(Enter the DNS addresses you copied down after you ran ipconfig /all)
Keep clicking on OK until you get out of the Network settings. You will probably need to reboot. After rebooting, open an MS/DOS window and do ipconfig /all again. Verify that your settings are as you expect them. Verify that you have a good connection by typing ping yahoo.com (or any other existing site)
Important An address like '192.168.1.15' is not routable, which means that it will only work when you are behind a router. If you ever need to connect directly to your cable modem, you must switch back to DHCP.
2.Click on the Firewall button and Copy and paste this into the Firewall form
/usr/sbin/iptables -R INPUT 7 -j logdrop
/usr/sbin/iptables -R INPUT 1 -j logdrop -m state --state INVALID
3. Reboot the router by clicking on the Reboot Router button. (So that the 'Startup' and 'Firewall' scripts you entered, above, will be run.)
Now you can install Kiwi Syslog Daemon.

