DShield Honeypot Setup with pfSense
Setting up a DShield honeypot is well guided by the installation script [1]. After several minutes of following the instructions and adding some custom details, the honeypot is up and running. What's needed after that is to expose the honeypot to the internet. I recently decided to update my home router and thought it was a great opportunity to dig into using pfSense [2]. To expose the honeypot using the pfsense, there are two main options to consider for NAT rules [3]:
- 1:1 NAT
- Port forwarding
This will help guide you through the process of implementing these NAT rules and testing connectivity to your honeypot, or any other device you may be exposing to an internal or external network.
If you feel your settings are not taking effect, it may be due to the settings taking some time to apply. One way to attempt to get around this waiting period is forcing a Filter Reload.
Status --> Filter Reload
Click "Reload Filter" to refresh the rules and see the status.
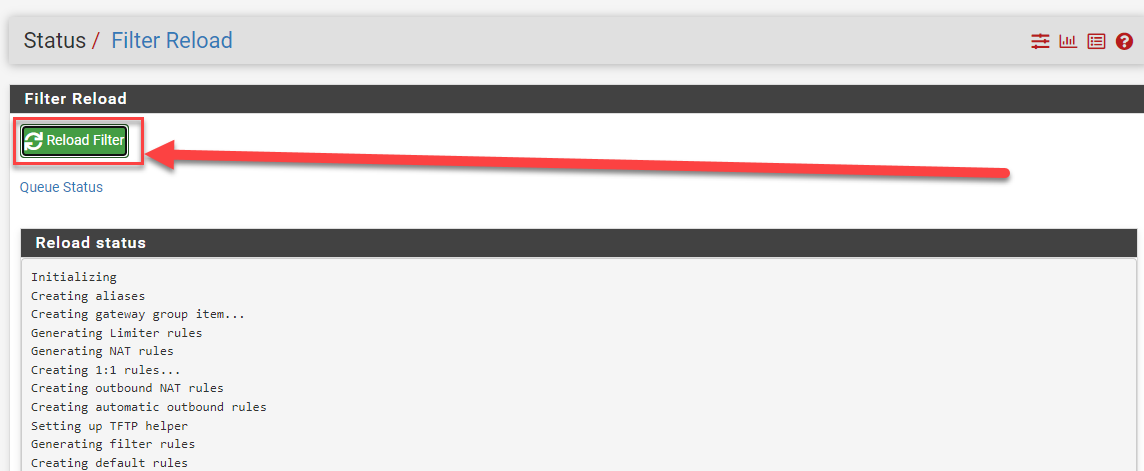 Figure 1: Filter Reload status screen
Even if you are not having an issue with the speed of rule changes and how they are being applied, I highly recommend using the "Reload Filter" when removing NAT rules. I have noticed the behavior that the NAT rules appears to still function after removed, but have not timed now long it takes to apply without action. For me it was still functioning after 30 minutes of removing a rule and using the "Apply Changes" button.
1:1 NAT
The 1:1 NAT will expose the entire honeypot to the internet. This is what most people are used to doing with the "DMZ" settings on a home router. It simply redirects all traffic hitting the public IP address to whatever address is specified on the internal network. This can also make things much easier if there are updates to the honeypot and an additional port needs to be exposed. As soon as it's exposed on the honeypot itself, there is no need to do anything further with the NAT rule.
In order to set the 1:1 NAT, the settings can be found on Firewall --> NAT --> 1:1 (tab). Usually, the only thing required to enter into this section is the "Internal IP" and to set the description for the rule. Use the either of the green "Add" buttons near the bottom of the Rules screen to start the process of adding the new 1:1 NAT rule.
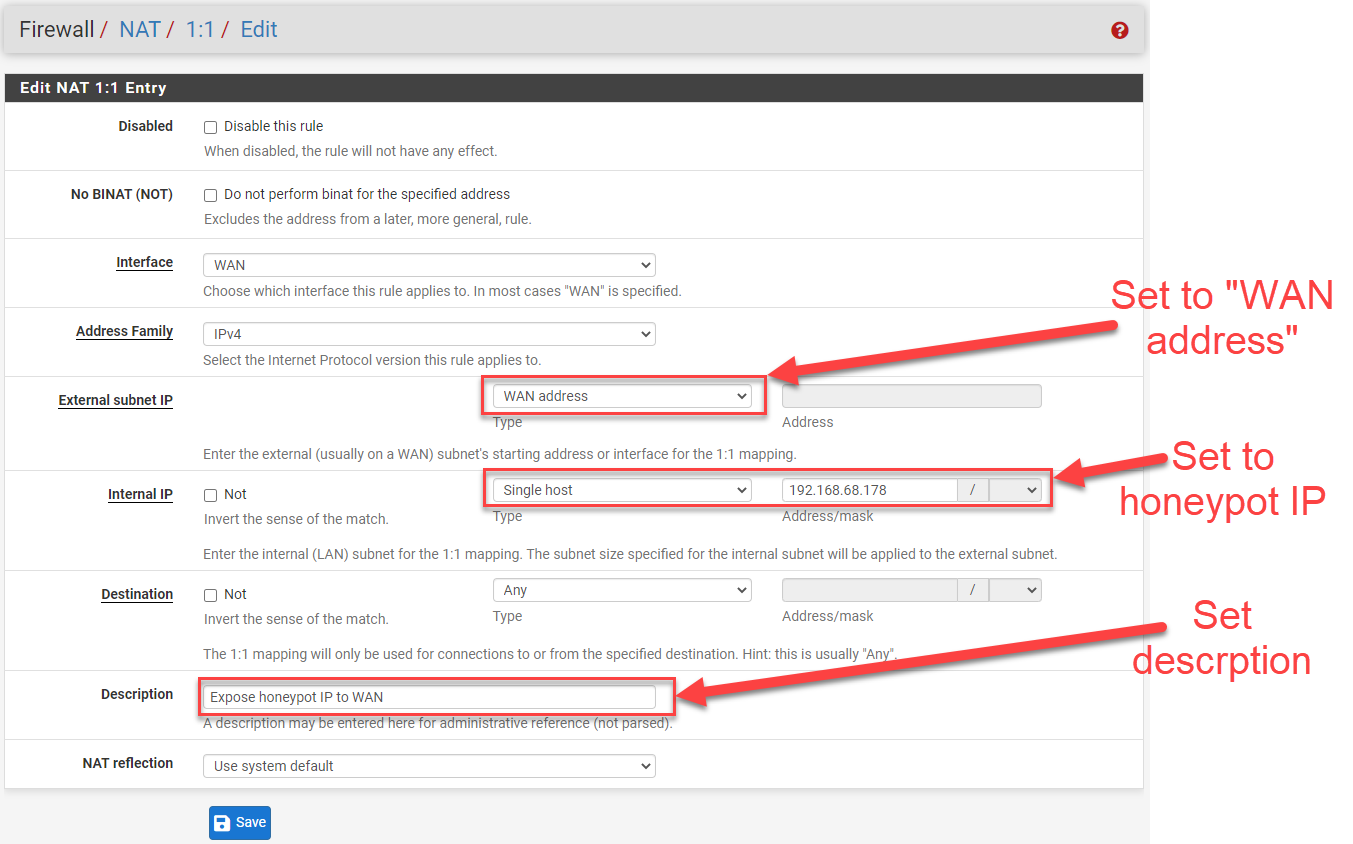 Figure 2: 1:1 NAT rule settings
An interesting artifact of the 1:1 NAT is that it doesnot create any firewall rules so that external IP addresses can access any services from the public IP address and the honeypot exposed behind it. A new firewall rule needs to be created for the NAT.
Firewall --> Rules --> WAN (tab)
The source will be from whatever networks you will wan to be able to access the exposed IP. I put "any" since I will want this publicly facing from anywhere. Also remember to set the Protocol to "Any". Even though TCP services are the ones exposed and collecting data, there could be other data collection options available in the future.
The destination IP for this rule will be your internal honeypot IP and not the WAN address.
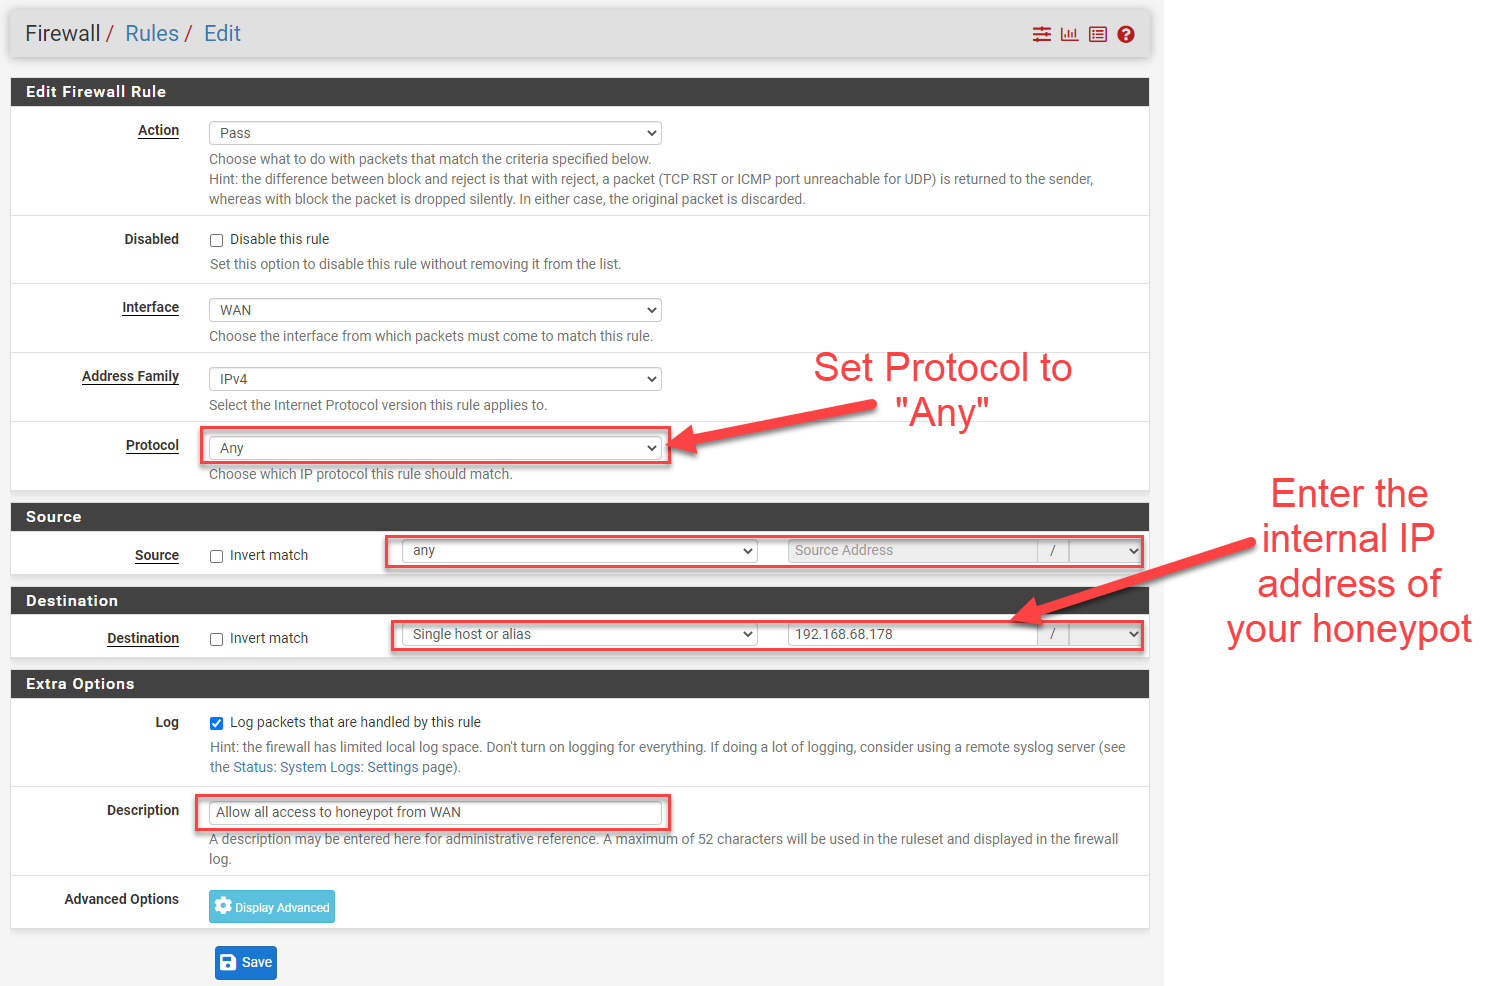 Figure 3: 1:1 NAT Firewall rule allowing all traffic
Connectivity to the honeypot using the external IP needs to be tested. The built in status script can help to give information on the health of the honeypot and if it is properly exposed.
sudo /srv/dshield/status.sh
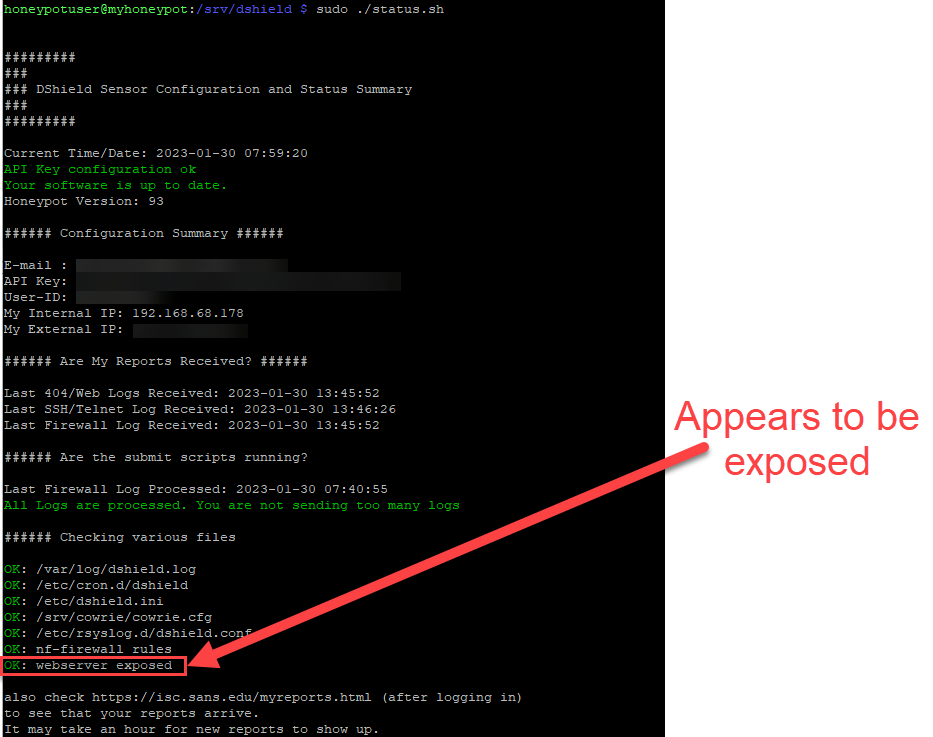
Figure 4: Output of status.sh script showing webserver exposed to internet
Another way to test connectivity is to connect to your public IP address from another host, scan it with Nmap or use a service like Shodan [4]. I used the Shodan CLI to test connectivity. This utility is built into Kali and is very easy to use. In order to use this service, an API key is required [5].
shodan init <enter API key here>
shodan info
shodan scan submit <enter IP address or subnet to be scanned here>
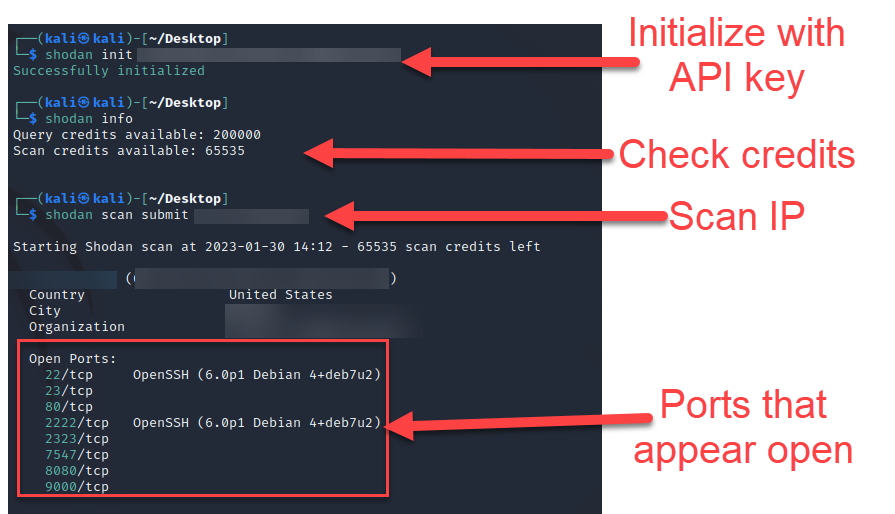
Figure 5: Shodan scan output from Shodan CLI
Shodan may respond that the host was already scanned recently and it will not scan it again. If you submit the scan again, it may perform the scan and give you the results. Otherwise you may need to test using another option, such as curl or nmap from another computer outside of your network.
curl -vv <enter public IP address>
nmap <enter public IP address>
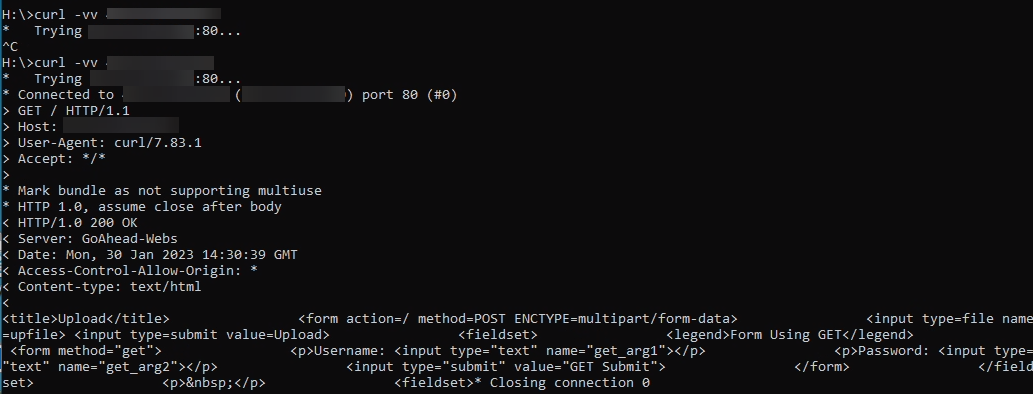
Figure 6: Curl output from port 80 of honeypot
These results also appear appropriate for the honeypot. It appears that it is exposed based on the NAT rule.
Determining Ports to Open
If you didn't want to fully expose the honeypot, another option is to create a variety of port forwards. The big question is which ports to forward to the honeypot. There are several ways to determine this from the honeypot. One is to look for listening ports on the honeypot to determine what to expose. Another is to review the local firewall ruleset and see what ports are made publicly available.
The listening ports on the honeypot can be quicky found using netstat.
sudo netstat -tulpn | grep LISTEN

Figure 7: Using netstat to view listening ports
This shows a variety of ports open, including the internal SSH administration port (TCP 12222) a custom port that I had created (TCP 6889) and an unused SMTP port (TCP 25). From the look of things, there are only a few ports expoesd.
- TCP 8000 (custom web port)
- TCP 2223 (custom telnet port)
- TCP 2222 (custom SSH port)
If we took this list, we would be missing a few things. While I could always run an nmap scan to view what ports to expose, it may also show other ports that should not be exposed, such as TCP 12222 which is used for internal SSH administration. Looking at the nftables [6]firewall rules is another good method.
sudo cat /etc/network/ruleset.nft
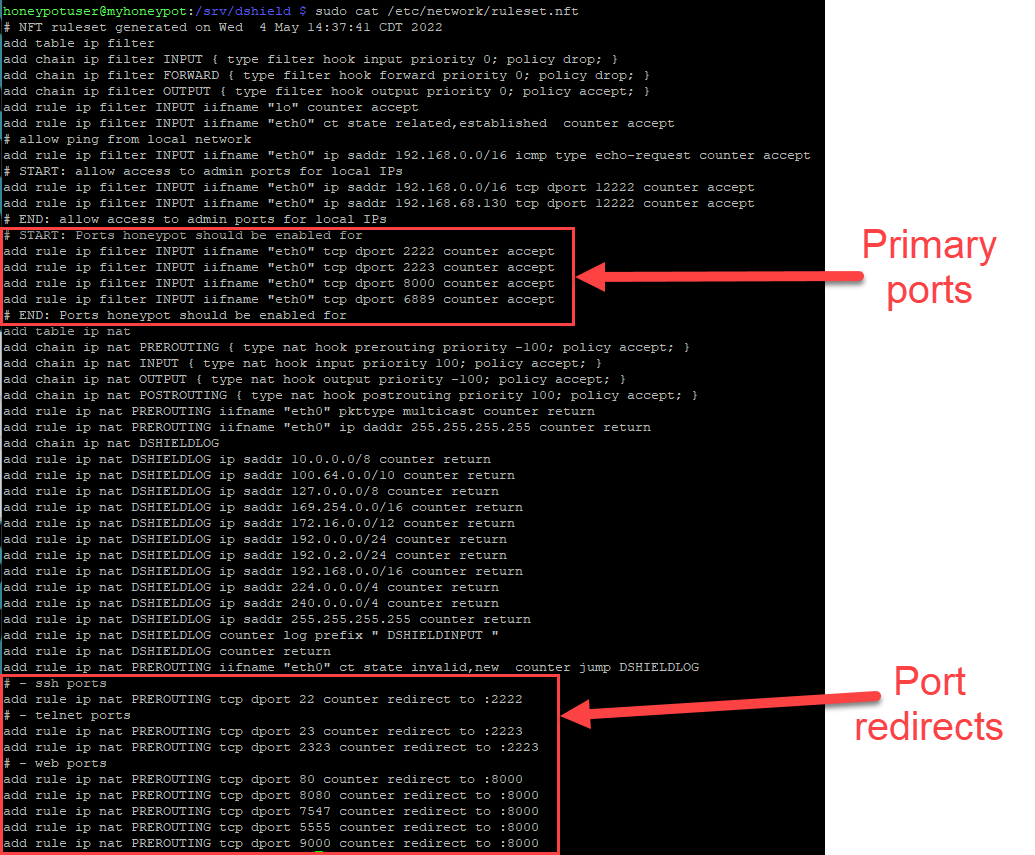
Figure 8: Check firewall rules for ports to be exposed
Note that I am ignoring port 6889. This was a custom exposed port that I had put in place and didn't list in the standard ports that were being exposed at the time of this writing.
Based on the rules, important ports are:
- 22 --> 2222
- 23 --> 2223
- 2323 --> 2223
- 80 --> 8000
- 7547 --> 8000
- 5555 --> 8000
- 9000 --> 8000
Redirected listeners:
- 2222
- 2223
- 8000
This matches the previous Shodan scan, outside of TCP 5555. Taking a look at earlier Shodan data from the public IP did show this port as historically open.
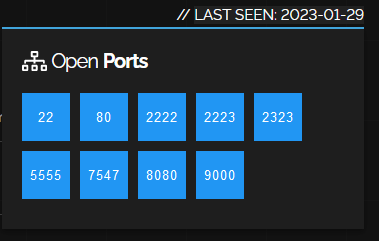
Figure 9: Results from historic Shodan data for open ports
At the very least, this gives a good idea for what ports to exposed through port forwarding.
Port Forwarding
The port forwarding option [7] will allow you to select specific ports that hit the public (WAN) interface to be redirected to the internal honeypot IP. Since we're implementing this for multiple ports, using a port Alias [8] will be very handy. We can create a collection of ports that we'll use for the port forwarding using one port forwarding rule. Otherwise, we would need to create multiple port forwarding rules, one for each port.
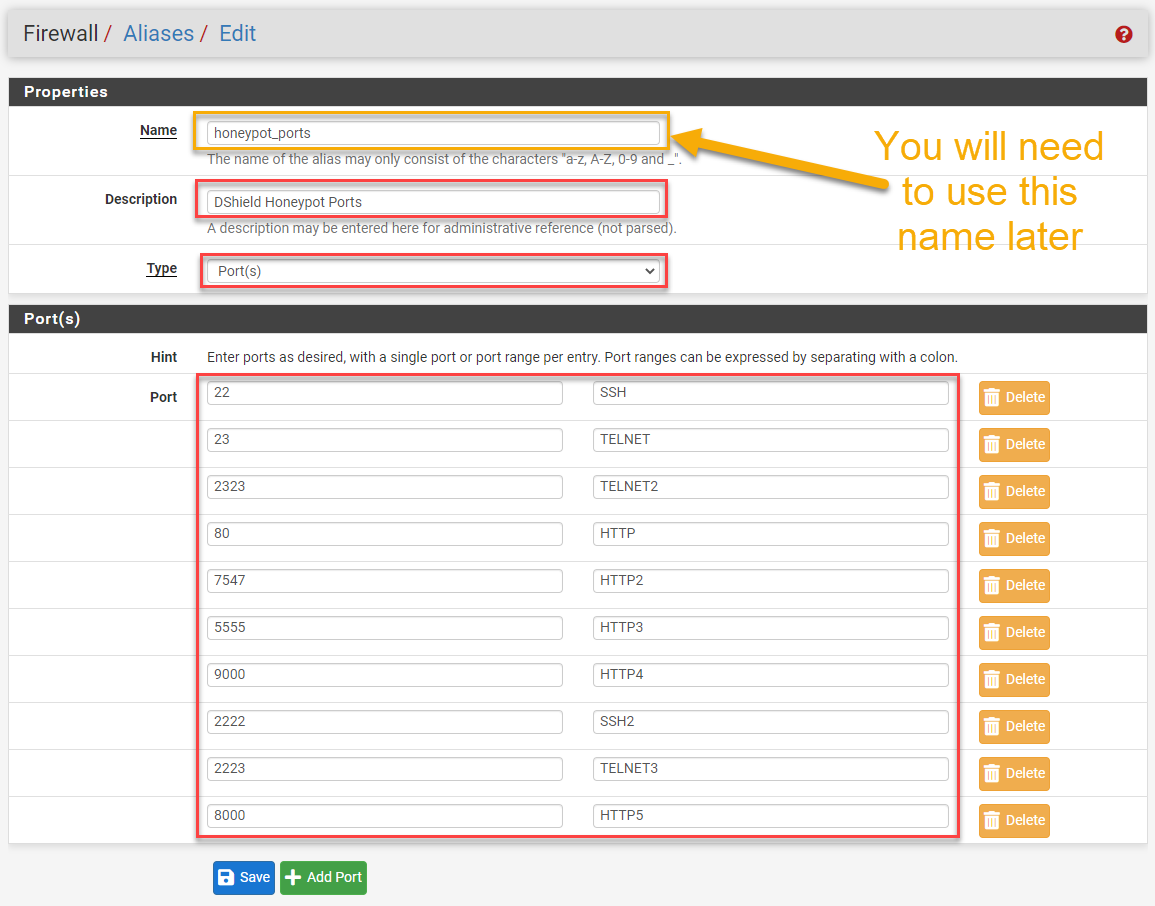 Figure 10: Port aliases for honeypot ports
Once the port alias is defined for the honeypot ports to be exposed, the port forward rule can be created.
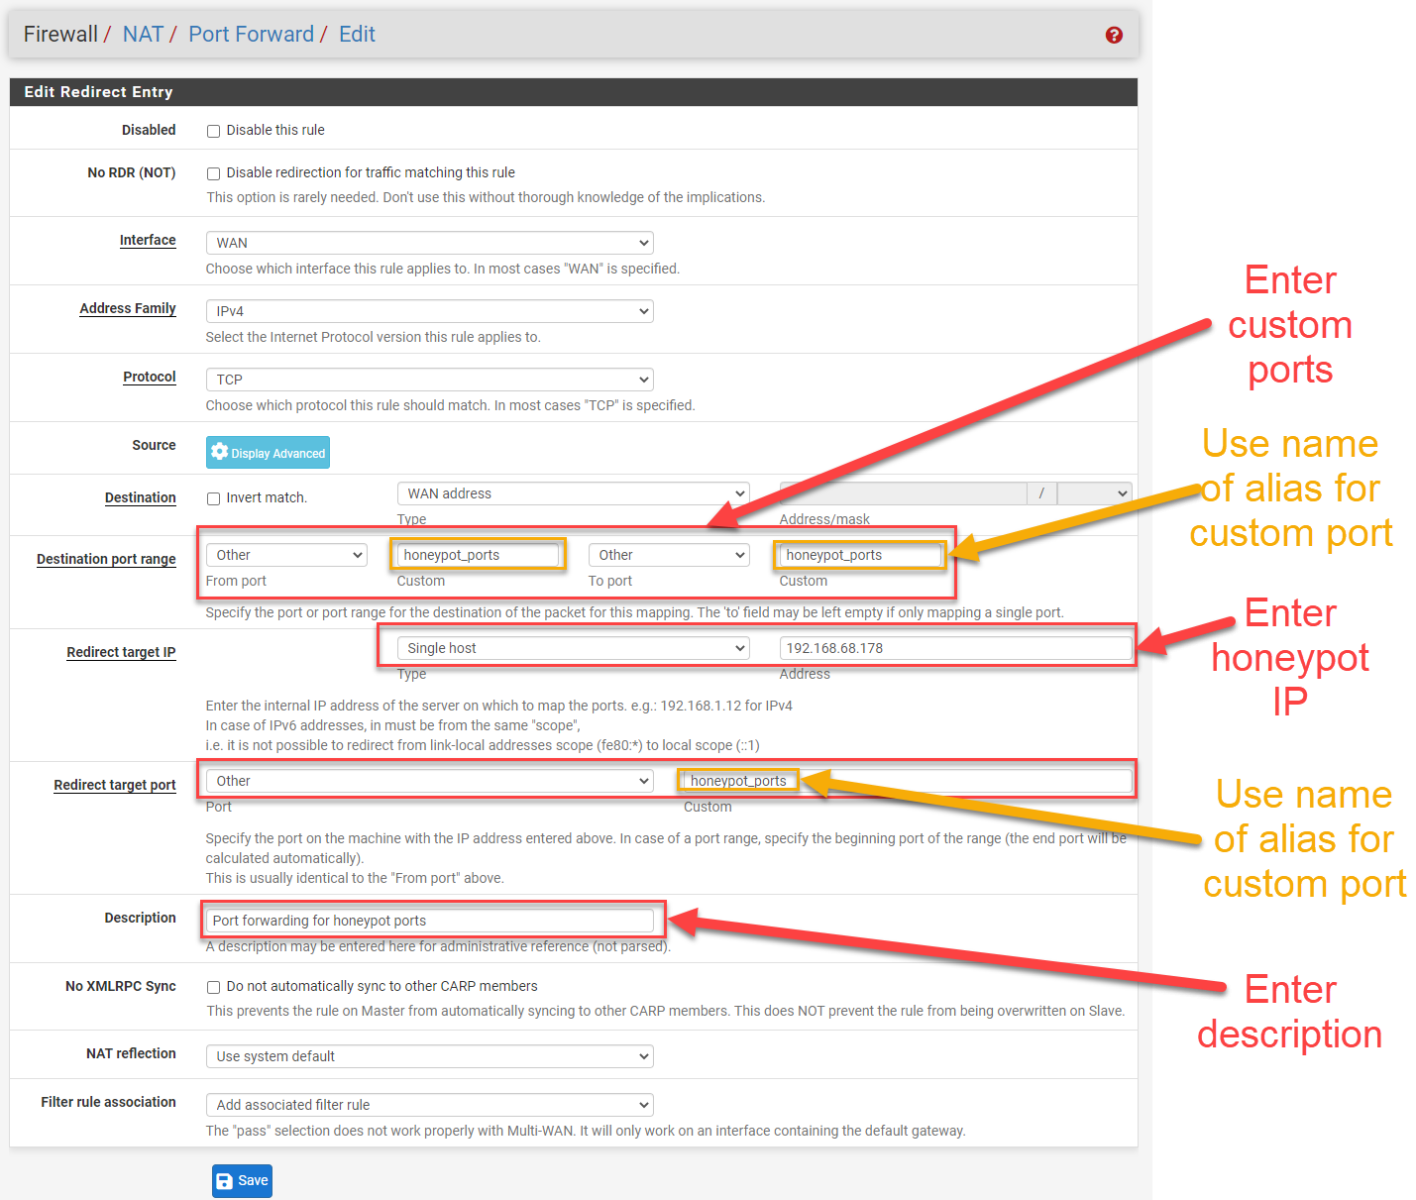 Figure 11: Port forwarding rule using custom port alias
There are a variety of options when considering how to expose a device to the internet. In this case, my preference is the 1:1 NAT since I don't need to update the rule on a regular basis.
[1] https://isc.sans.edu/honeypot.html
[2] https://www.pfsense.org/
[3] https://docs.netgate.com/pfsense/en/latest/nat/index.html
[4] https://www.shodan.io/
[5] https://help.shodan.io/the-basics/on-demand-scanning
[6] https://wiki.nftables.org/wiki-nftables/index.php/Quick_reference-nftables_in_10_minutes
[7] https://docs.netgate.com/pfsense/en/latest/nat/port-forwards.html
[8] https://docs.netgate.com/pfsense/en/latest/firewall/aliases.html
--
Jesse La Grew
Handler


Comments
Sam
Feb 1st 2023
3 years ago
Sam
Feb 1st 2023
3 years ago
Jesse
Feb 1st 2023
3 years ago
I have PFSense configured with a 192.168 address. I cannot disable DHCP on my router. I have the firewall connected to my VPN through Wireguard. The lan is on 10.0.0. It is not a static private VPN address.
How best to port forward in such a setup.
gld8r
Feb 1st 2023
3 years ago
Sounds like you might have a bit more complicated setup for your honeypot network architecture. I'd recommend joining the Slack channel and we could chat more about it there. https://isc.sans.edu/slack/
Jesse
Feb 1st 2023
3 years ago